Table of contents
- Intro to WorkCompass
- Getting Started
- Additional reviewers and external reviewers
- How to create a performance plan
- Editing performance plans
- Editing ratings
- Email notifications schedule
- WorkCompass Admin Dashboard
- Leadership and Engagement Surveys
- Understanding Insights (reporting)
Intro to the WorkCompass Performance Plan Process
Creating a plan in WorkCompass is a collaborative process between Managers and their direct reports.
The following is a basic overview of the WorkCompass performance review process from start to finish. There are more ways to customize this process, so these are just the basic step:
- Create a plan (Draft): Employee creates plan or Manager creates a plan for the Employee. Plan status at this stage is “DRAFT”.
- Request approval (Draft awaiting approval): Employee asks Manager to provide input on the plan or approve the plan.
- Approval (Current): Once the Manager approves the plan, the plan enters the review stage. Plan status changes from “DRAFT” to “CURRENT”.
- Final review Employee (Current): The Employee completes their self-review and clicks on Complete final review button once finished.
- Final review manager (Archived): The Manager completes their review of the Employee and clicks on Complete final review button. This archives the plan. At this stage, only the Manager or an Admin can reopen the plan.
How to login to WorkCompass
- Click on the WorkCompass link you’ve received via email to create your password.
- Open the link in Google Chrome or Firefox (Internet Explorer and Microsoft Edge browsers are not compatible with WorkCompass) to create your password.
- Enter your work email address in the Email field.
- Enter the password you created in the Password field.
- Click Sign in.
How to reset your password
- Click on your WorkCompass login link.
- Click on Forgot your password button.

- Enter the email associated with your WorkCompass account
- Click on Send password reset instructions.

- You will receive an email from WorkCompass with a link to reset your password.
Adding and Archiving Users
How to add a new user to WorkCompass (ADP users)
Please note that if you are an ADP user and have synced your ADP account with WorkCompass via the ADP connector, you will need to add new users in ADP, rather than in WorkCompass.
How to add a new user to WorkCompass (for non-ADP users)
If you do not have the ADP Connector, follow the steps below to add a new user:
- Login to WorkCompass.
- Click on People tab at the top of the Home page.
- Click Add Person on the top right-hand side of the page.

- Fill out the new employee form and click Save at the bottom of the page.

- If you would like to send the user a welcome email and invite him to activate his WorkCompass account, click the blue Invite button in the top right-hand corner of the next page. The new user will receive a welcome email with two links: one link where he will create a new password and another link he can use in the future to access WorkCompass.

Why does WorkCompass say I can't add more users?
If all your user licenses are in use, then you will not be able to add more users. To purchase additional licenses, please reach out to support@workcompass.com.
How to archive a user (ADP users)
If you use the ADP Connector, you will need to archive the user via ADP. Before archiving the user, you will need to make sure that any direct reports listed under them have been reassigned to a new manager. Once you have done so, you can archive the user in ADP. This change will carry over to WorkCompass.
How to archive a user (non-ADP users)
If an employee has left the organization their account can be archived by following the steps below:
- Login to your WorkCompass account.
- Click People at the top of the Home page.
- Look up the User by name via the Search bar.
- Click on the user’s name to open his profile.
- Reassign their direct reports (if any) to a new manager. You will not be able to archive a user if they still have direct reports.
- Click on Archive on the top right-hand corner of the page.
How to change an Employee’s Manager
Only Admins can change an Employee’s Manager. To do so, please follow the steps below:
- Login to your WorkCompass account.
- Click on People tab at the top of the Home screen.
- Search for the user via the Search bar.
- Click on the user’s name to open his profile.
- Click on Edit at the top right-hand corner of the page.
- Scroll down to Manager section and select the new Manager from the drop-down menu.
- Click Save at the bottom right of the page.
How to create/edit a performance plan
- Login to WorkCompass and click on your name on the right-hand side of the page.
- Click Create a Plan on the right-hand side of the page, or open an already created plan by clicking on the name of the plan you wish to edit.
- Start to type your goals. The AI will help you to create SMART goals (Specific, Measurable, Actionable, Relevant, Timebound). If you would like to add a milestone, adjust the weight, add a note, or attach a document please click on the three dots to the right of the goal.

- Once you are happy with your goals, click on Next to continue. You will notice that the plan quality score in the right-hand corner will go up as you add items to the plan.
- Select competencies from the drop-down list. Competencies can be defined as the skills you need to reach your goals. These can be skills that you have already mastered, and need to continuously apply to your role. They can be skills that you already possess, but may need to work on them in order to perform to the best of your ability. The best practice is to select 3-5 competencies.

- When you have selected the competencies, click on Next to continue.
- The next section is for development needs. This is where you can free type your skills' gaps, or what you require in order to be able to reach your goals. The best practice is to enter 3-5 development needs.
- When you have completed all sections of the plan, click on “Ask your manager for input” at the bottom right of the screen. Your manager will get an email notification asking them to review your performance plan.
Please note, the names and number of sections may be different depending on your company's configuration.
Additional Reviewers and External Reviewers
In addition to Managers, additional reviewers and external reviewers can also provide feedback on an Employee's goals and competencies.
Additional reviewer - another Employee within the organization, but outside of the reviewee's direct line.
External reviewers - does not work for the organization, but is someone that the reviewee may have collaborated with, such as a client or a contractor.
How to add an Additional Reviewer to a plan
The additional reviewer only has access to the review, not the draft plan. Only Managers or Admins can add an Additional Reviewer to an Employee's plan. The steps are as follows:
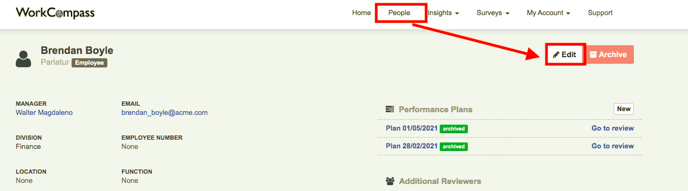
- Look up for the Employee's profile using the People tab, and entering his name in Search bar.
- Click on the Employee's name to open his profile, and then click on Edit in the right upper corner.
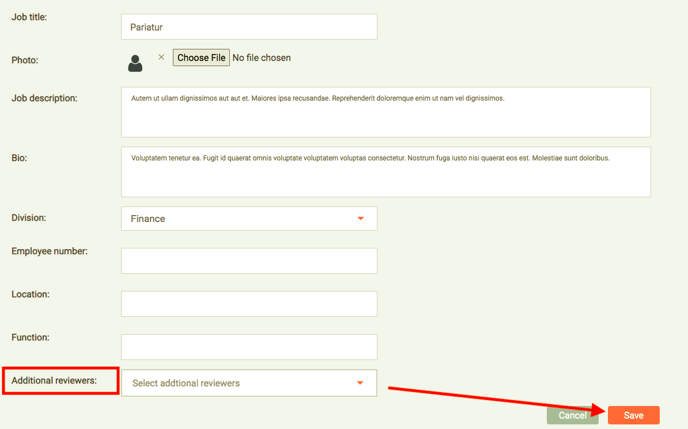
- Scroll down to the page to Additional Reviewer section.
- Use the drop-down menu to find the name of the desired person.
- Once clicked on the name, please press Save at the bottom of the page.
- The Additional Reviewer will receive an email notification and will also see a task to complete their review on their WorkCompass Home page. They will receive this notification 28 days before the final review due date.
How to add an External Reviewer to a plan
The external reviewer will only see the text of the Employee's specific goal or competency that they are invited to provide a rating for. Employees, Managers, and Admins can add external reviewers.
To add an external reviewer please follow the steps below:
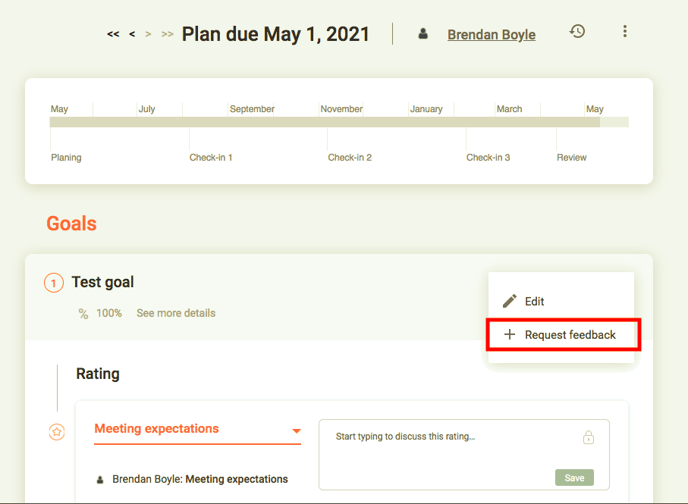
- Click on Go to review next to the plan that you would like to edit.
- Beside each goal or competency, there are three dots. Click on three dots, then click on Request Feedback.
- Enter the email address of the person who you want to provide the feedback.
The external reviewer will receive an email immediately with a link taking them directly to the particular goal or competency in WorkCompass. They will only be able to submit a rating and/or comment on this particular goal or competency. They will not be able to see any other parts of the plan, such as milestones for the goal, or previous comments made by the direct Manager of the Employee, additional reviewers, or the employee themselves.
Editing Performance Plans
Milestones
Adding milestones to goals is a best practice as they help Employees break goals down into smaller bite-sized pieces, and allow Employees and their Managers to track progress on goals. Users will get an email on the day that their milestone is due to, with a link to their plan where they can update their progress on milestone.
To add a milestone follow the steps below:
- Click on the name of the plan that you would like to edit.
- Click on the three dots next to the goal to add a milestone.
- Select the due date for the milestone and enter the milestone text.
To update progress against a milestone follow the steps below:
- Click on the link in the email notification about the milestone. This will take you directly to the milestone you need to edit.
- Use the slider to update your progress (0% complete, 50% complete, 100% complete).
- Leave a comment to explain your rating and click Save to save the comment.
How to delete a plan
Admins, Managers & Employees all have the ability to delete plans.
Please note that once a plan is deleted, it cannot be recovered.
To delete a plan, click on My account, and proceed with Profile. Then click on the name of the plan you would like to delete. Click on the three dots in the top right-hand corner of the page and proceed with Delete.
How to complete a check-in (interim review)
You can set up check-ins, also called interim reviews, (monthly, quarterly, or biannual) by getting in touch with the WorkCompass Customer Success team via support@workcompass.com.
WorkCompass will send users an email notification on the day the two-week check-in period begins, and will also create a task on users' Home page. The steps to complete a check-in are as follows:
- Open the review page of the plan by clicking on the name of the task in your WorkCompass account on your Home page, clicking on Go to review next to the name of the plan in your Profile, or by clicking on the link that was sent to you via email notification.
- Review the performance plan. Add any comments related to progress on goals, competencies, and development needs.
- Click Complete check-in.
How to complete a final review
When it’s the right time to perform the final review, WorkCompass will send you an email notification and will also create a task in your dashboard (this will happen 28 days before the final review is due). In order to complete a final review follow the steps below:
- Open the review page of the plan by clicking on the name of the task in your WorkCompass account on your Home page, clicking on Go to review next to the name of the plan in your Profile, or by clicking on the link that was sent to you via email notification.
- Review the performance plan.
- Click Complete final review button.
Email notifications schedule
Users will see tasks on their WorkCompass Home page. The same tasks will also be sent as email notifications.
The below shows the timing for emails for the account with quarterly reviews set up. Please keep in mind that this may look a bit different if you have monthly or biannual reviews set up by your organization:
- 1 day after final review due date: beginning of new planning phase
- 3 months after first day of planning phase: check-in 1
- 6 months after first day of planning phase: check-in 2
- 9 months after first day of planning phase: check-in 3
- 28 days before final review due date: start of final review phase
- day the milestone is due: update progress against milestone
- 15th day of every month: monthly digest with outstanding actions to perform
The WorkCompass Admin Dashboard
How can we adjust dates on the Performance Review Calendar
The WorkCompass Support Team will make any changes to the Performance Review Calendar for you. Please contact support@workcompass.com with your request.
How to manage and edit organization goals
To edit the organization goals please follow the steps below:
- Log into your WorkCompass account, and click on My account in the top menu bar.
- In the drop-down menu click on Organization Settings.
- On the next page, on the left side, please click on Organization goals.
- To edit a goal, click on the pencil icon next to the goal. After changing it, please proceed with Save.
How to manage divisions
You have options to add divisions, edit division names, and delete divisions. In order to add a divisions and edit divisions' names, please follow the steps below:
- Log into your WorkCompass account, and click on My Account.
- In the drop-down menu, click on Organization Settings.
- On the next page, on the left side under Organization Settings, please click on Division management.
- To edit the name of a division, click on the pencil icon next to the division name. After changing it, please proceed with Save.
- To add a division, click on the Add new division button.
Please keep in mind that if you archive a division the Employees who were listed under this division will no longer be assigned to a division in WorkCompass.
How to edit division goals
To edit divisional goals, you will first need to add divisions to your WorkCompass account.
After adding divisions, please follow the steps below:
- Log into your WorkCompass account, and click on My Account in the top menu bar.
- In the drop-down menu click on Organization Settings.
- On the next page on the left side under Organization Settings, please click on Division goals.
- To edit a goal, click on the pencil icon next to the goal. After changing it, please proceed with Save.
Plan template
The plan template can be accessed by clicking on My Account, proceeding with Organization settings and then clicking on Plan template (on the left sidebar of the page).
The plan template is used to edit the different sections of your plan, as well as the ratings.
The name of each section can be customized, so you are free to use internal terminology.
Editing ratings
Ratings can be edited by following the steps below:
- Click on My Account, and proceed with Organization Settings.
- Click on Plan templates on the left hand side of the page.
- Click on the pencil icon next to the ratings drop-down menu. You can delete ratings, add ratings, and edit rating names. Once you have made the desired changes click Ok.

Adding plan template sections
You can also add sections to the plan template, by scrolling to the bottom of the page and clicking on the drop-down menu next to Add new section.

The following types of sections can be added to the plan template:
- Multiple-choice: Users will select options from a drop-down menu like they do with competencies. This type of section can be rated. To add a rating, click on the three dots to the right of the section name and click on Add rating.
- Free text: Users are free to free type, similar to development needs.
- Questions: Users will respond to questions via a free text box. Questions are customizable. To add them you will need to click the three dots to the right of the section, and then click on Add question.
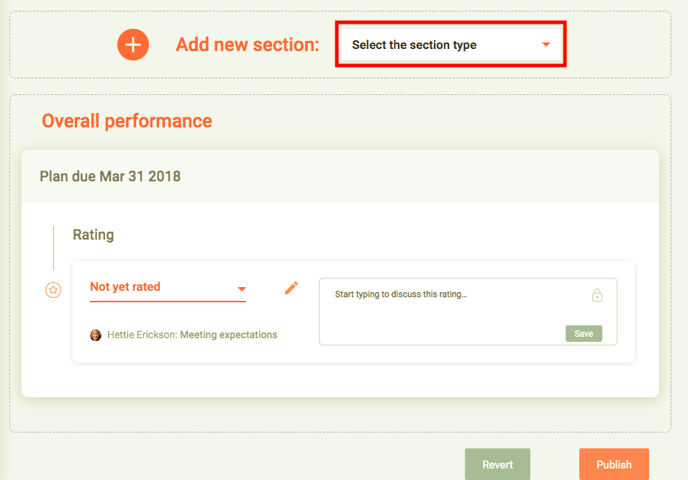
To publish changes to the plan template, scroll to the bottom of the page and click on Publish.
Leadership and Engagement Surveys
As an Admin, you will be able to send out leadership and engagement surveys to your organization's members.
To do so, simply click on the tab at the top of the page labelled Surveys, and then click on Create engagement/leadership survey.
The engagement survey will be sent out to the whole organization, while for the Manager survey you can choose which Managers will be evaluated. For both surveys, you can customize the survey instructions. Once you are happy with the instructions, press Send to send the survey to users.

Please see the leadership survey questions below:


Please see the engagement survey questions below:


If you do not have the option to start surveys, this means that you don't have the feature enabled for your site. To activate surveys, contact us at support@workcompass.com, so that our Support Team can change your account settings.
Understanding Insights
Insights are here to help you to understand performance trends and have an overview of how different divisions and individual contributors are doing. Insights are answering fundamental questions like:
Team Performance: Is performance improving?
This report shows performance trends based on final reviews. You can drill down to see who and what is causing certain trends.
View this report by clicking on Insights, and then clicking on Progress from the drop-down menu. This will show you the performance of Employees with a current plan.
Calibration: are standards being fairly and consistently applied?
This insight shows how each Manager rates their team and compares that with a normal distribution of ratings and the organization's overall distribution. You can view data based on completed final reviews, or interim ratings by clicking Drafts only.
Open actions: who needs to do what?
This insight shows an overview of the actions that your team members have to perform. You can mouse over actions and the system will show who needs to do what.
Performance & Potential: Who is top talent? Who needs development?
This chart allows you to track your staff’s Performance & Potential as rated by their Managers. Ratings against goals determine the performance position left to right. Rating against competencies determines the potential top to bottom.
This is based on final reviews as well. You can also click on Export Summary (shows overall score) or Export Detail (shows scores for each goal and competency), to download an Excel file with even more data.
Strategy Overview: are we executing our strategy?
This report allows Managers to easily identify the areas or Employees in the organization that are on track and which ones need improvement.
Each circle represents a goal, and you can also click on them to see who set the goal, and understand how individual goals are impacting divisional goals and in turn organization goals (as long as your organization goals are linked in this way on WorkCompass).
Green means goals are on track, orange means they are slightly overdue, and red means they are very overdue. If a milestone is added to a goal, this will affect the color of the goal.
Status Report: an overview of the current status of each plan
Admins can quickly see the status of each Employee’s plan for a particular period of time. Status definitions are as follows:
- No plan
- Needs Approval
- Approved
- Overdue
- Completed
Development Needs Report
You can download an Excel file showing the plan status as well as goals, competencies, and development needs for every user by following the steps below:
- Click on Insights, then click on Status report.
- Use the drop-down menu in the top right corner to select the date.
- If your performance calendar follows the calendar year (Jan 1 - Dec 31) select 20XX Plan.
- If your performance calendar does not follow the calendar year, proceed with Select date range, and enter the start date and end dates.